Categories
Linux

Non-destructively testing repairs to damaged filesystems

Let's say you have a damaged, unmountable btrfs filesystem. You run btrfs check which tell you about some problems, but the documentation strongly advises you not to run btrfs check --repair.

WARNING: the repair mode is considered dangerous and should not be used without prior analysis of problems found on the filesystem.

While btrfs check tells you the problems it finds, it does not tell you what changes it would make. It would be great if "repair" had a mode that would tell you what changes it would make, without committing yourself to those changes. Sadly there is no such mode - so what options do we have?

Brute force?

The brute force approach is to back up the devices comprising the damaged btrfs filesystem to another location, so that they could be restored if btrfs check --repair doesn't work out. This could be a lot of data to backup and restore, especially if the filesystem consists of multiple volumes comprising multiple terabytes of data.

What about...

Instead of brute force we could use virtualised discs and a hypervisor. Qemu's qcow2 disc format lets us set up virtual discs with a backing volume set to the damaged drive/partition. This means that virtual disc reads come from the backing volume, but any writes are made to the virtual disc rather than the backing volume. This means that we don't need huge quantities of storage to back up the data, and if we don't like the changes that were made by "repair" or other tools we can easily reset by deleting the virtual discs or by using qemu's snapshot feature.

This copy-on-write technique can be used not just with btrfs and "btrfs check --repair" but with other filesystems and other tools to repair those filesystems. For example, were you to edit some of the filesystem structure with a programme you'd written yourself, as I talk about in another post.

A complication with btrfs filesystems is that a device id is stored inside volumes of a filesystem. When mounting/checking btrfs will scan all discs and partitions to find devices, and mount them if the device ids match, so you do not want both the original disc and the virtual disc to be visible. You do this inside a virtual machine simply by ensuring only the virtual discs are mapped into the virtual machine. That is, don't map in the original file systems as raw discs!

Setting up a kvm virtual machine

You'll need a virtual machine to mount these virtual filesystems. If you don't already have a virtual machine set up, you'll need to create one. As we're using qemu virtual discs, this means you need to use the kvm/qemu/libvirtd hypervisor stack. There are several ways to set up a virtual machine and many good guides on the web about how to do this, so I won't repeat them here but I'll just say that on my Ubuntu system I used uvtool to quickly set up the VM to test my filesystem changes.

Setting up copy-on-write virtual discs

The qemu-img command creates these virtual filesystems. If a btrfs filesystem comprises multiple discs or partitions, we need to create a separate virtual disc for each physical disc/partition.

The following command creates a virtual disc that uses /dev/sdd2 as its backing file, and any changes to this virtual disc are written to the file ssd2_cow.qcow2.

qemu-img create -f qcow2 -o backing_file=/dev/sdd2 -o backing_fmt=raw sdd2_cow.qcow2

I ran similar comands once for each underlying disc/partition that was part of the btrfs filesystem.

To attach one of these discs disc to an existing VM the basic command is:

virsh attach-disk <VM NAME> /home/user/sdd2_cow.qcow2 vde --config --subdriver qcow2

However on ubuntu, I ran into some (reasonable) restrictions imposed by apparmor. I would receive an error attempting to attach the virtual discs, with an error from apparmor showing up in the logs:

[56880.068334] audit: type=1400 audit(1673655958.288:119): apparmor="DENIED" operation="open" profile="libvirt-c712b749-0f68-413f-9bd7-76ea061808eb" name="/dev/sde2" pid=58733 comm="qemu-system-x86" requested_mask="r" denied_mask="r" fsuid=64055 ouid=64055

The problem is that the hypervisor is by default prevented from accessing the host's raw discs. When the hypervisor attempts to read the backing file (or later, to lock it) apparmor prevents this. We solve this by adding lines to /etc/apparmor.d/local/abstractions/libvirt-qemu for each raw disc or partition that backs one of our virtual discs.

/dev/sde2 rk,

This line allows libvirt/qemu to open the raw disc for read access (r), and allows the raw disc to be locked (k). We do not grant write access to libvirt/qemu so this provides an extra line of defence against unintended changes to our original filesystems.

Once apparmor was configured, I could attach these discs to my virtual machine, and access the virtual devices at locations such as /dev/vde.

Final thoughts

With this or similar techniques you can safely test fixes to damaged filesystems without risking the underlying data. Once you're happy that your fix will have the desired effect, you can apply it to the real filesystem.
Categories
Linux

Building package from source:Cannot open POTFILES.in.temp for writing

I recently ran to an error when building a .deb package from source (on Ubuntu). I found a few people asking for help with the error message over the year, but I didn't find anyone offering an answer.

~/src/collectd-5.12.0$ debuild -us -uc -i -I
dpkg-buildpackage -us -uc -ui -i -I
dpkg-buildpackage: info: source package collectd
dpkg-buildpackage: info: source version 5.12.0-6
dpkg-buildpackage: info: source distribution unstable
dpkg-buildpackage: info: source changed by Bernd Zeimetz bzed@debian.org
dpkg-source -i -I --before-build .
dpkg-buildpackage: info: host architecture amd64
fakeroot debian/rules clean
dh_testdir
dh_testroot
rm -f build-stamp
[ ! -f Makefile ] || /usr/bin/make distclean
rm -f debian/README.Debian.plugins
rm -f src/.1 src/.5
rm -rf debian/pkgconfig
dh_autoreconf_clean
dh_clean
debconf-updatepo
print() on closed filehandle OUT at /usr/share/intltool-debian/intltool-extract line 942.
Cannot open POTFILES.in.temp for writing at /usr/share/intltool-debian/intltool-update line 615.
make: *** [debian/rules:271: clean] Error 1
dpkg-buildpackage: error: fakeroot debian/rules clean subprocess returned exit status 2
debuild: fatal error at line 1182:
dpkg-buildpackage -us -uc -ui -i -I failed

In my case, the error occurred because I had downloaded the source package as root, so this caused permissions issues while building the package as a user.

$ sudo apt source collectd

If your source is owned by root as mine was, the solution is to change the ownership of the files to your user.

$ sudo chown <YOUR USERNAME>.<YOUR USERNAME> -R ~/src/collectd-5.12.0
Categories
Linux

Raspberry Pi camera & Shinobi CCTV

Raspberry Pis make for really good HD CCTV cameras as they're cheap, small and have wifi in the newer iterations. There seem to be two good CCTV recording packages at the moment - Shinobi & MotionEyes. It took some effort to get Shinobi to communicate with the camera on my Raspberry Pi, so this post records what I had to do, for posterity.

If you search on the internet about RaspberryPi cameras and Shinobi you find a bunch of posts talking about setting up an RTSP stream for Shinobi to connect to. And on the Shinobi discord, a developer pointed to https://gitlab.com/Shinobi-Systems/shinobi-ip-camera. None of these instructions worked - I think they may have been for an older version of Raspbian. So firstly lets go through the software versions and hardware versions that I'm dealing with.

The hardware is a Raspberry Pi 3, and a Raspberry Pi ZeroW. Both of these have built in wifi which makes things easier. With these I'm using official Raspberry Pi cameras. I'm using the latest version of Raspbian at the time of writing - Raspbian GNU/Linux 10, and Shinobi ocean-1.

What eventually worked for me was adapted from a couple of web pages, particularly https://gist.github.com/neilyoung/8216c6cf0c7b69e25a152fde1c022a5d, and involved gst-rpicamsrc and gst-rtsp-server which contained the test-launch programme.

  1. Download and build https://github.com/thaytan/gst-rpicamsrc. In the future this will be part of gstreamer (from version 1.18) so you won't need to do this step any more.
  2. Find out your gstreamer (gst) version e.g. with apt search libgstreamer. At the time of writing this is libgstreamer1.0-0/stable 1.14.4-1 armhf. You then need to download the version of gst-rtsp-server that matches your libgstreamer1.0 version. So I downloaded gst-rtsp-server-1.14.4 from https://github.com/GStreamer/gst-rtsp-server and build that.
  3. sudo apt install gstreamer1.0-plugins-ugly gstreamer1.0-plugins-bad gstreamer1.0-plugins-rtp
  4. gst-rtsp-server provides a utility called test-launch. It sets up an rtsp server. I manually ran this with test-launch ( rpicamsrc bitrate=8000000 awb-mode=auto preview=false rotation=180 ! video/x-h264, width=960, height=540, framerate=10/1 ! h264parse ! rtph264pay name=pay0 pt=96 ). This command had a resolution for a v1 camera. If you use a v2 camera you will want to choose a different resolution. I found this page to be useful for understanding the modes available.
  5. I then was able to configure Shinobi to connect to rtsp://CAMERA_IP:8554/test.
  6. The final setup was to install test-launch as a permanent background task in systemd. Put a file with the following contents into /etc/systemd/system called e.g. cam-stream.service then run systemctl start cam-stream && systemctl enable cam-stream.

[Unit]
Description=auto start cam stream
After=multi-user.target
[Service]
Type=simple
ExecStart=/home/xxx/bin/test-launch ( rpicamsrc bitrate=8000000 awb-mode=auto preview=false rotation=180 ! video/x-h264, width=960, height=540, framerate=10/1 ! h264parse ! rtph264pay name=pay0 pt=96
User=xxx
WorkingDirectory=/home/xxx/shinobi
Restart=on-failure
[Install]
WantedBy=multi-user.target

Categories
Music

How to use Reason with ReBirth RB-338 on 64-bit Windows 7 or 8

Probably because I'd been listening to some Acid Techno earlier in the week, I woke up this morning with the urge to play with a 303. So the obvious thing to do was to dig out ReBirth RB-338 and run it through Reason.

I was eventually able to get them working together on my computer (which runs Windows 7) but it took a few hours and its not easy, as the required information is all over the internet, not in one place. Next time I reinstall my computer I'll probably have to go through this all over again so I've made some notes which hopefully will also be of assistance to others.

One important thing to note is that this procedure will not work with Reason version 8.2 or higher because Propellerheads have abandoned the 32-bit version of Reason. If you have Reason 8.2 then you will have to either side-install 8.1 (as 8.2 and 8.1 may be able to co-exist) or downgrade to 8.1 in order to use ReBirth. I haven't tried it so I don't know for sure, but I would expect that any songs created in 8.2 would not open in 8.1.

You may need to use bittorrent to download some files if the Rebirth Museum website is offline- I recommend an open source client like Deluge as some of the past favourites like uTorrent have really gone down the pan lately.

32-bit Reason

ReBirth is an old application from long before the 64-bit days. It seems that 64-bit Reason will only talk view ReWire to 64-bit applications, so if you have Reason 6 or later (which are 64-bit by default) then you will need to install the 32-bit version of Reason. Its possible to do this side-by-side with your existing 64-bit version, without uninstalling it. Reason 8.2 or higher only comes in a 64-bit version, so you cannot use any later version of Reason after 8.1 in conjunction with ReBirth.

To install 32-bit Reason you need to start the installer with the parameter "/32". You can do this by running cmd.exe or you can do this with a shortcut. I'll show you how to do this with a shortcut.

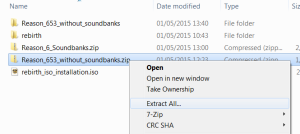
Download the reason installer from the account section of the propellerhead website. (If you have the original CD then you can skip downloading and adjust these instructions appropriately). The installation files should be in a .zip file, you will need to extract these to a folder somewhere (right-click on the .zip file and select "Extract All...").

Extract the .zip file containing reason

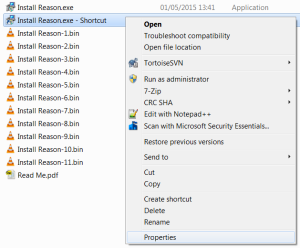
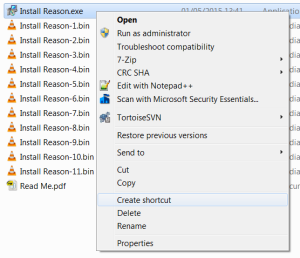
Browse to the folder that you extracted the images to, right-click on the .exe and select "Create Shortcut".

Create a shortcut to the installer

Edit the shortcut by right-clicking and selecting properties.

Edit the shortcut by selecting properties
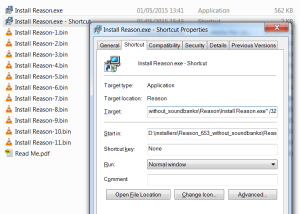
Edit the shortcut

In the target box, add the parameter " /32" (without the quotes) to the very end of the line then select OK.

Add "/32" to the shortcut

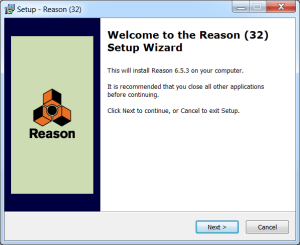
If you launch the shortcut now, the installer will install the 32-bit version of Reason instead of the usual 64-bit version. Remember, Reason 8.2 and higher no longer support 32-bit installations so you must be using a version of Reason less than this. You can verify that everything has gone ok so far, as the installer window that comes up will offer to install "Reason (32)", instead of the usual "Reason".

Reason (32) installer
32-bit Reason installer

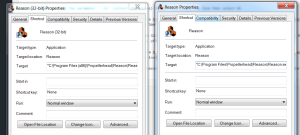
Its possible to have both the 64-bit and 32-bit versions of reason installed simultaneously. Make sure that any shortcut you use to start Reason is starting the correct version - in Reason 6.5.3, both the 32-bit and 64-bit shortcuts in the start menu are given the name Reason, so its hard to distinguish between the two! You can check the shortcut you are using launches the correct version of Reason by verifying the installed directory - 32-bit Reason will install into a directory within "C:\Program Files (x86)\", while the 64-bit Reason will instal into "C:\Program Files\".

32-bit reason shortcut is on the left - notice the (x86)!

ReBirth RB-338

I've based this section on a 5 year old guide over at gearslutz, however some of the information is out of date.

Propellerhead have discontinued ReBirth (on computers at least - they have recently brought out an iPad App which you cannot use with Reason). However all is not lost, as they have released the original ReBirth as unsupported freeware. They have created an archive website called the ReBirth Museum where you can download ReBirth and get access to various mods that people have made for the programme over the last couple of decades.

Downloading ReBirth RB-338

Unfortunately, at the time of writing, the Rebirth Museum is down. Part of the website has been archived at The Wayback Machine however you need to register in order to download the ReBirth installer which means that archive.org can't help us. So we'll have to use bittorrent to download the necessary files. Maybe by the time you read this the ReBirth Museum will be back online, in which case you may be able to skip some of this section.

Firstly you need to retrieve an image of the rebirth cd. This is available via a bittorrent magnet link or you may be able to find it via google by searching for  "rebirth_iso_installation.iso" or "rebirth_iso_installation.zip". However there are a vast number of questionable sites purporting to provide a .torrent but instead providing suspicious .exe files so I highly recommend using the magnet link to avoid all that nonsense. If noone is seeding the first torrent, I also found a second torrent. If you're not sure which bittorrent client to use, I recommend an open source one like Deluge - some of the closed source clients are full of dodgy adverts.

Once you have the .iso file you may either burn it onto a CD or use some virtual cd drive software to mount it as a new drive letter. I recommend the second option as having to find and insert a CD to use a piece of software is rather inconvenient. I used Virtual CloneDrive which is freeware.

Insert the burnt CD, or mount the iso in CloneDrive as you will need this when you launch ReBirth. There is an installer on the CD however this doesn't work with 64-bit windows so you will need an alternative. Some kind chap has made a 64-bit compatible installer which you can find at sendspace, or via bittorrent. The 64-bit installer will place ReBirth into a fixed location: for me it was "C:\ReBirth RB-338\". Once it has finished running you must navigate to this directory and perform a few actions before you run ReBirth.

Post-Installation

Firstly, you may need to rename ReBirth.dll_ to ReBirth.dll and ReWire.dll_ to ReWire.dll. If either or both of those dlls are already suffixed with .dll this is ok, you've saved a bit of effort.

Secondly  you must acquire WinHlp32.exe. For Windows 7 try https://www.microsoft.com/en-us/download/details.aspx?id=91 and for Windows 8 try https://www.microsoft.com/en-us/download/details.aspx?id=35449. If you have no joy with those links, try searching Microsoft's website for WinHlp32.exe. If you have problems installing the file, have a look at section 2.3 of the gearslutz guide for some troubleshooting tips.

Edit (11/12/2015): Commenter ron (who is clearly a pretty cool dude) provides the following tips to install WinHlp32.exe on Windows 10:

i have got it working on win 10 64
just download winhelp for win 7 then
unzip and right click on install file and click edit
under the "settings" text add this
set WindowsVersion=7
goto :BypassVersionError
then save the file
then run as administrator and rebirth will work :)

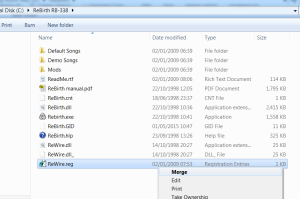
The final step to get ReBirth working with Reason is to configure ReWire. The installer didn't do this for me automatically, so I had to Merge the ReWire.reg file which exists in the ReBirth folder. Until I merged this file, I would get an error when adding the ReBirth instrument to Reason: "ReBirth not found / Could not load ReBirth Engine / Make sure ReBirth is properly installed".

Merge the registry file to configure Rewire

At this point you should be able to launch ReBirth. Press play and you should be able to hear the default tune.

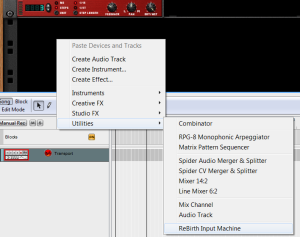
If that worked OK then you should be able to launch the 32-bit version of Reason and add a ReBirth Input Machine.

ReBirth Input Machine lives under Utilities

If its working correctly both green lights will be on, so wire up the instrument into the Mixer and pressing play in Reason. You should hear ReBirth's default tune playing again, but this time via Reason!

Both green lights will be on if its working correctly.

Any problems, let me know!

Categories
Linux

Mitigating bitrot and corruption in a linux md raid-1 array

A while ago I had the misfortune of running into data corruption issues with two different motherboards both of which caused corruption in my mdadm raid-1 array. This is the overview of how I identified corrupt files and healed the array, which I hope may provide a useful signpost to anyone else who runs into similar issues. At the end of this article I link to another post where I provide more detail about the problems with a particular Gigabyte motherboard.

ASUS P5QL-Pro

The first, an ASUS P5QL-Pro would occasionally misread bytes 14 or 15 (mod 16). It had been doing this for several months before I gained a full understanding of what was happening. I experienced occasional processes crashing for no clear reason, a downloaded iso which,when burnt to a USB stick and booted, was corrupt. I had also noticed around the same time, that transmission (the torrent client I had used) would occasionally state that already downloaded files were corrupt, so I would have to recheck them and download any corrupt parts. I blamed transmission for having buggy torrent code. Eventually I noticed that if I copied a large file, its md5sum wouldn't be the same as the original. I was able to simplify the issue in the end merely by running md5sum twice on the same 64GB file and observing different checksums each time.

After trying various combinations of hard discs, sata cables, sata ports and filesystems, I ruled out the possibility of a failing hard disc, a bad sata cable, a damaged sata port or a Linux filesystem bug. I also used the most recent version of md5sum and sha256sum, ran memtest86, used a sata card instead of the onboard sata ports, and reproduced the issue after booting from a usb stick. This eliminated software issues in md5sum, bad memory, a bad sata controller chip and a bad Linux installation. I suspected that the motherboard might be at fault, so I swapped everything over to another motherboard. This solved the immediate problem but..

Gigabyte GA-P35-DS4

After swapping everything over to the Gigabyte board, it would no longer boot! Grub failed to load the raid partition. After some investigation it turned out that the BIOS was confiscating part of the disc in order to store a backup of itself in a "Host Protected" Area and there was no option to disable this feature in the BIOS! After removing the HPA and changing the SATA ports the affected discs were connected to, I was able to boot from the partition, but a chunk of data on one half of the raid-1 array had been overwritten. Raid-1 has two copies of data, so losing one of them might not be fatal.

How bad was it?

A quick google didn't reveal many people who'd recovered from incidents like this but there didn't seem to be much support within the mdadm toolset for raid-1 recovery, and there didn't seem to be many pre-existing tools to help.

I needed to catalogue the extent of the damage, so I wrote a programme to compare the two constituent partitions that made up the raid array and printed a message when they differ. After identifying the sectors that differed, it was clear that it was just a few megabytes at the end of 1 disc.

It was then a simple matter to replace the corrupted data with data from the good disc, and the md array would load properly!

The next challenge was to prevent this happening again, and the simplest method ended up being changing the order that my disc drives were connected to the sata controllers, so that the bios "stole" some of a different disc for its bios backup. Have a look at the following post if you want a lot more detail about Gigabyte's unfortunate bios.

Categories
Linux

Building wine from source on 64-bit debian

If you need a particular version of wine to run a particular windows programme, you may well need to build wine from source. Most windows programmes need 32-bit wine so you can't simply build the package from source on your 64-bit installation of debian. The multi-arch feature of debian has matured a lot however there are still packages which can't have the 32-bit and 64-bit versions simultaneously installed. Because of this, you will need to build the 32-bit wine packages inside some kind of chroot environment. I am going to show you a fairly straightforward way of doing this with the help of lxc (Linux Containers).

Outline

Find and download source packages for your version of wine at http://snapshot.debian.org/package/wine-unstable/

Install build dependencies, possibly substituting package versions if you're not running debian unstable.

Build 64-bit wine as normal.

Set up a 32-bit container, install build dependencies and build wine in it.

Download source packages

Find the version of wine you require at http://snapshot.debian.org/package/wine-unstable/ and download the three files that make up the make up the source package. There should be an orig.tar.bz2, a .dsg and an .xz. For example, wine-unstable_1.7.17-1.debian.tar.xz, wine-unstable_1.7.17-1.dsc and wine-unstable_1.7.17.orig.tar.bz2. For the rest of this post I shall use 1.7.17 as an example, but feel free to substitute any particular version of wine that you might prefer.

Build dependencies

The version of wine in debian stable at the time of writing is 1.4 and the build dependencies have changed somewhat between that package and recent versions of wine-unstable. If you do "apt-get build-dep wine" it will install a lot of the build dependencies of wine-unstable but it won't get all of them, so you will have to install some manually. (If you are running debian unstable then you can probably just do apt-get build-dep wine-unstable and get all of them directly, but if you're running debian unstable I would question why you need help from this article!)

To find out the packages that are required to build wine-unstable, you can unpack the archive and look for the Build-Depends line in debian/control, or you can just attempt to build the package and wait for any error message!

$ dpkg-source -x wine-unstable_1.7.17-1.dsc
$ cd wine-unstable-1.7.17
$ dpkg-buildpackage 
dpkg-buildpackage: source package wine-unstable
dpkg-buildpackage: source version 1.7.17-1
dpkg-buildpackage: source changed by Michael Gilbert <mgilbert@debian.org>
dpkg-buildpackage: host architecture amd64
 dpkg-source --before-build wine-unstable-1.7.17
dpkg-checkbuilddeps: Unmet build dependencies: libgphoto2-dev libfreetype6-dev (>= 2.5.1) libgstreamer-plugins-base1.0-dev
dpkg-buildpackage: warning: build dependencies/conflicts unsatisfied; aborting
dpkg-buildpackage: warning: (Use -d flag to override.)

The build dependencies may vary from version to version of wine so I can't give you exact instructions here. In this case, none of the three packages exist in the version of debian that I have installed. I substituted libgphoto2-2-dev, an earlier version (2.4.9) of libfreetype6-dev, and libgstreamer-plugins-base0.10-dev. Close enough. Remember the packages you install here as you will also be installing them to build the 32-bit version of wine.


You can now build the 64-bit version of the package with the -d option to ignore the build dependency problem:

dpkg-buildpackage -d


Building 32-bit wine

Unfortunately, having the 64-bit wine packages aren't enough as most windows programmes are compiled against 32-bit windows, so you will need to build the 32-bit packages. You can set up a chroot environment by hand with debootstrap and do this, or you can use lxc to set up a container for you. Containers are somewhere between a chroot and a virtual machine. The advantage of using lxc is that it takes exactly one command to set it up:

sudo lxc-create -n32bitwine -t debian -- --arch i386

This will set up a basic 32-bit debian environment in /var/lib/lxc/32bitwine/rootfs. Copy the 3 wine source packages to the location within this environment that you will build them - for example the /root folder. Then enter the container:

sudo lxc-start -n32bitwine

You will see a basic debian system booting, and you will be able to login as root with the password that was displayed at the end of the lxc-create command output. Set up your 32-bit build environment by addding a deb-src line to /etc/apt/sources.list and running apt-get update.

You may need to run "dpkg-reconfigure locale" if you see a lot of errors about LC_ALL like this:

perl: warning: Setting locale failed.
perl: warning: Please check that your locale settings:
LANGUAGE = "en_GB:en",
LC_ALL = (unset),
LC_TIME = "en_GB.utf8",
LANG = "en_GB.utf8"
are supported and installed on your system.
perl: warning: Falling back to the standard locale ("C").

You will need to set up your 32-bit build dependencies as before. So I would recommend running "apt-get build-dep wine" to get most of the dependencies installed, then install 32-bit versions of the same packages that you had to install to get 64-bit wine built.

Then extract the source archives (that you previously copied into the container) and build the package:

$ dpkg-source -x wine-unstable_1.7.17-1.dsc
$ cd wine-unstable-1.7.17
$ dpkg-buildpackage -n

If all has gone well, you can shut down the container with "sudo lxc-stop -n32bitwine" then copy the 32-bit packages out of your container filesystem. The 32-bit packages you need to install are wine32-unstable and libwine-unstable, while the 64-bit packages you need are wine-unstable, wine64-unstable and libwine-unstable.

Install those packages along with the 64-bit wine packages manually and you are good to go!

sudo dpkg -i libwine-unstable_1.7.17-1_amd64.deb libwine-unstable_1.7.17-1_i386.deb wine32-unstable_1.7.17-1_i386.deb wine64-unstable_1.7.17-1_amd64.deb wine-unstable_1.7.17-1_amd64.deb
Categories
Linux

Warning about large hard discs, GPT, and Gigabyte Motherboards such as GA-P35-DS4

Or, Gigabyte BIOS considered harmful

After changing the motherboard, a computer became unbootable because the Gigabyte BIOS created a Host Protected Area (HPA) using sectors already allocated to a disc partition, corrupting the partition table and overwriting data.

What Gigabyte are trying to do is store a copy of the BIOS onto disc in order to secure the computer against viruses. The process is explained over here in the section titled "GIGABYTE Xpress BIOS Rescue™ Technology" (and is referred to in the specification of the motherboard as "Virtual Dual BIOS"). At boot time, a copy of the BIOS is stored into an unused section of the disc by creating a Host Protected Area. If a virus corrupts the BIOS then it can apparently detect this and restore the safe copy of the BIOS from the disc. Magical!

This process goes badly wrong when you have discs larger than 2TB. The traditional partition table format, which dates back to the early 80s, runs into a limit when discs reach 2TB. A new partition table format was created called GUID Partition Table (GPT) which handles much larger discs.

If you have certain Gigabyte motherboards with the Virtual Dual BIOS feature, then as the computer boots it will try and create an HPA on the first hard disc, and save the current BIOS there. One assumes that if the partition table indicates that the disc is already full, then the BIOS will avoid creating this HPA. What seems to be happening with large hard discs with GPT, is that the BIOS doesn't understand the partition table, doesn't realise that the all space on the disc is entirely accounted for already, then grabs some of the space from the end of the disc and overwrites it with a copy of the BIOS.

Once the HPA has been created, the size of the disc that is reported to the OS changes. This means that the values stored in the GPT structures don't match those reported by the disc so may make it impossible to boot from the disc - which is what happened to me.

How do I tell if I have this problem?

You are likely to see this problem if you have a disc larger than 2TB that you partitioned with a GPT on a different motherboard then attached to the Gigabyte motherboard as the first hard disc.

For me, I had a 1.5 TB disc with a /boot partition and 2 3TB discs in raid-1 via Linux software raid (mdadm). I had partitioned these discs on a different motherboard and the computer would boot without problems, however when I switched to the Gigabyte motherboard it would no longer boot. Specifically, I would receive a grub error like this:

error: disk 'mduuid/3c620ba3b6ebc2ba2dec4bdc61f7191b' not found.
Entering rescue mode...
grub rescue>

When I booted from a usb stick and attempted to mount the raid partition it was only able to load one of the discs:

ubuntu@ubuntu:~$ sudo mdadm --assemble /dev/md0
mdadm: /dev/md0 has been started with 1 drive (out of 2).
ubuntu@ubuntu:~$

I then ran gdisk to inspect each of the two discs forming the raid array, gdisk printed various errors about the disc that the BIOS had interfered with:

ubuntu@ubuntu:~$ sudo gdisk /dev/sdb
GPT fdisk (gdisk) version 0.8.8

Warning! Disk size is smaller than the main header indicates! Loading
secondary header from the last sector of the disk! You should use 'v' to
verify disk integrity, and perhaps options on the experts' menu to repair
the disk.
Caution: invalid backup GPT header, but valid main header; regenerating
backup header from main header.

Warning! One or more CRCs don't match. You should repair the disk!

Partition table scan:
  MBR: protective
  BSD: not present
  APM: not present
  GPT: damaged

****************************************************************************
Caution: Found protective or hybrid MBR and corrupt GPT. Using GPT, but disk
verification and recovery are STRONGLY recommended.
****************************************************************************

Command (? for help):

If one performs the recommended verification step, 5 errors are detected:

Command (? for help): v

Caution: The CRC for the backup partition table is invalid. This table may
be corrupt. This program will automatically create a new backup partition
table when you save your partitions.

Problem: The secondary header's self-pointer indicates that it doesn't reside
at the end of the disk. If you've added a disk to a RAID array, use the 'e'
option on the experts' menu to adjust the secondary header's and partition
table's locations.

Problem: Disk is too small to hold all the data!
(Disk size is 5860531055 sectors, needs to be 5860533168 sectors.)
The 'e' option on the experts' menu may fix this problem.

Problem: GPT claims the disk is larger than it is! (Claimed last usable
sector is 5860533134, but backup header is at
5860533167 and disk size is 5860531055 sectors.
The 'e' option on the experts' menu will probably fix this problem

Problem: partition 2 is too big for the disk.

Identified 5 problems!

Command (? for help):

In fact there is only 1 error, which is that part of the disc has been co-opted by the BIOS. This can be seen with hdparm (contrast sdb which has been corrupted with sdd which is in its original state):

ubuntu@ubuntu:~$ sudo hdparm -N /dev/sdb

/dev/sdb:
 max sectors   = 5860531055/5860533168, HPA is enabled
ubuntu@ubuntu:~$ sudo hdparm -N /dev/sdd

/dev/sdd:
 max sectors   = 5860533168/5860533168, HPA is disabled
ubuntu@ubuntu:~$


How do I fix the problem?

You must either live with the HPA, or remove it and ensure you never again boot with a the GPT disc as primary. Even if you decide to live with the HPA you will need to temporarily remove it so that you can backup your data or resize the partition and filesystem.

So regardless of what you choose to deal with this problem, you will need to disable the HPA and make the entire disc available. This can be done with hdparm, by setting the visible sectors to the full amount with the parameter "-N p<full amount of sectors>" as below:

ubuntu@ubuntu:~$ sudo hdparm -N /dev/sdb

/dev/sdb:
 max sectors   = 5860531055/5860533168, HPA is enabled
ubuntu@ubuntu:~$ sudo hdparm -N p5860533168 /dev/sdb

/dev/sdb:
 setting max visible sectors to 5860533168 (permanent)
 max sectors   = 5860533168/5860533168, HPA is disabled
ubuntu@ubuntu:~$

Now that this has been done, the GPT partition table will correspond to the number of sectors reported by the disc (although some data has been unavoidably lost when the BIOS overwrote the end of the disc). However if you reboot and this disc is still the primary disc then the BIOS will just create the HPA again!

Categories
Linux

Monitoring several log files in one terminal window using screen

When debugging website problems I often run tail on /var/log/apache2/error.log or on /var/log/apache2/access.log. Today I needed to monitor both at the same time. One solution is to open two terminal windows, however this uses up valuable entries in the alt-tab list. A better solution for this purpose was to create two windows with the screen utility.

There are 3 key commands to use:

  • "Ctrl-a |" which splits the screen into two windows
  • "Ctrl-a <tab>" which sends focus to the next window
  • "Ctrl-a c" which opens a new shell in the current window

So after running screen, I ran
tail -f /var/log/apache2/error.log
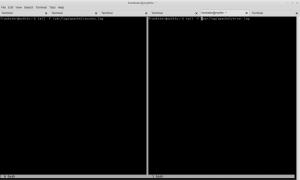
I then pressed "Ctrl-a" followed by "|" (after releasing the control key) to split the window, "Ctrl-a" followed by tab to switch focus into the window I just created, "Ctrl-a" followed by "c" to start a new shell, and finally:
tail -f /var/log/apache2/access.log

Split screen monitoring

Categories
Linux

Steam Hardware Survey: All Linux distributions increase in popularity

Valve's Hardware Survey for July 2013 shows an increase in usage for every recorded Linux distribution, with each distribution seeing increases between 7-22%. As every single distribution seems to be increasing in popularity, I interpret this to mean that as time goes on more people are trying gaming on Linux and they are staying with Linux.

Distribution Proportion of users Increase as proportion of total users Relative increase
Ubuntu 13.04 64 bit 0.43% +0.03% +7%
Ubuntu 12.04.2 LTS 64 bit 0.20% +0.02% +10%
Ubuntu 13.04 0.13% +0.01% +8%
Ubuntu 12.04.2 LTS 0.11% +0.01% +9%
Linux 64 bit 0.10% +0.01% +10%
Linux Mint 15 Olivia 64 bit 0.09% +0.02% +22%
Total 1.06% +0.10% +9%

Note that due to the precision of data that is provided there are likely to be rounding issues, so the relative result in the right hand column could be +/- a few percent.

Categories
Linux

dkms.conf: Error! No 'BUILT_MODULE_NAME' directive specified for record #0.

I recently had an error crop up with an installation of Linux Mint Debian Edition. When upgrading a kernel, or adding/removing certain software packages, or typing "dkms autoinstall" the following error appeared:

dkms.conf: Error! No 'BUILT_MODULE_NAME' directive specified for record #0.
Error! Bad conf file.
File: 
does not represent a valid dkms.conf file.

The error message seemed to be complaining about a file called dkms.conf. Searching for files with that name led me to a file which clearly didn't have a BUILT_MODULE_NAME directive:
/var/lib/dkms/ndiswrapper/1.57/build/dkms.conf

$ cat /var/lib/dkms/ndiswrapper/1.57/build/dkms.conf
 PACKAGE_NAME="ndiswrapper"
 PACKAGE_VERSION="1.57"
 DEST_MODULE_LOCATION[0]="/updates"
 AUTOINSTALL="yes"

This file came from the package ndiswrapper-dkms, so purging the package cleared out the problem and allowed modules to be built once again.

dpkg --purge ndiswrapper-dkms

Categories
Internet

Dealing with website forms that disable pasting

Occasionally I run across a website that thinks its a good idea to arbitrarily restrict fundamental functions of my browser. Recently I signed a petition (about poorly conceived internet regulation) which asked for my email address twice. Obviously I'm not going to type it twice, I'm going to type it once, copy it, then paste it into the second box. Except nothing happens. Have I hit the wrong key? Try again. Nope still doesn't work. Frustration mounts.

I took a look at the code to see how they did it by right-clicking in the offending text box and selecting "inspect element". some bright spark used on_paste="return false"
It's easy to see that they have implemented this anti-feature with the piece of code that says:
onpaste="return false"

One of the great features about the Chrome/Chromium browser is that you can directly edit the page via Inspect Element and instantly see the results. So after double-clicking on the onpaste element, and deleting it - I was able to paste my email address into the form!

Categories
Linux

Improving the fonts in Linux Mint Debian Edition with Infinality

It turns out that the fonts in LMDE look a bit different to those in say Ubuntu. This is partly because of Ubuntu's theme, and partly because Debian's font rendering is a little dated. There is a guy over at http://www.infinality.net/blog/ who has made some patches to the font renderer (freetype and fontconfig) which haven't yet been picked up by Debian. I installed these patches and it made quite a difference to some text in Firefox.

some text from firefox before and after installing infinality

Notice how the text in the upper half has the C and u in "Currently" touching, and each letter is quite skinny. While in the lower half of the image which I took after installing infinalty, the letters are better spaced, and a bit denser.

This is how I did it:

sudo apt-get install devscripts quilt
cd /tmp
wget https://github.com/chenxiaolong/Debian-Packages/archive/master.zip
unzip master.zip
cd Debian-Packages-master
cd fontconfig-infinality
./build.sh
cd ../freetype-infinality
./build.sh
cd ..
sudo dpkg -i *.deb

Categories
Linux

Copying Thunderbird settings from Windows to Linux (or vice versa)

One of the benefits of cross-platform software such as the Thunderbird mail client is that its often quite easy to transfer data from one platform to another. The data that Thunderbird creates (that contains your account settings, downloaded emails, mail filters etc.) seems to be identical whichever platform you run it on.

Under Linux, the data files live in "~/.thunderbird/". Under Windows 7, I found my settings in "C:\Users\<username>\AppData\Roaming\Thunderbird\". I suspect this location might move around a bit from one version of Windows to another. Searching for profiles.ini might be the best bet if you're trying to locate an existing installation.

So, once I had located the data files, all I had to do was mount the windows partition under Linux, and copy "profiles.ini" and the "Profiles" directory from the Windows location to "~/.thunderbird/".

You could also use this method to transfer your Thunderbird settings from one computer to another.

Categories
Linux

Installing Steam on 64-bit Linux Mint Debian Edition

One of my motivations for installing Linux Mint Debian Edition was to see for myself the efforts Valve have been making over the last few months, porting most of their games and their Steam platform to Linux.

It turns out that LMDE was not the best choice for this as the version of Linux that Valve primarily supports is Ubuntu, and there are a few differences between Debian and Ubuntu distributions - even though Ubuntu is more or less based on Debian.

One of the consequences is that the version of Steam distributed by Valve doesn't actually install on LMDE. Fortunately nearly all of the work to resolve this has been done already over here http://www.sarplot.org/howto/45/Steam_on_64bit_Debian_Wheezy_70. If you don't have an ATI graphics card those instructions might be all you need. If you do have an ATI card (like me) then when you try to launch steam, you may see the following error:

Error: You are missing the following 32-bit libraries, and Steam may not run:
libGL.so.1

One final step is needed, to have steam launching correctly:

sudo apt-get install libgl1-fglrx-glx:i386

Categories
Linux

Removing Linux Mint Debian Edition's Chromium search page

When you install Chromium in the latest version of Linux Mint Debian Edition (LMDE), typing anything in the search/address bar takes you to an awful custom search engine that wastes loads of space and hurts my eyes.

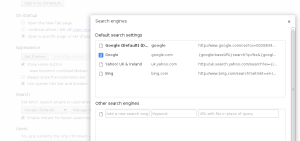
The awful search page that Mint installsSo, how do we get rid of it? We go to the chromium settings via the triple line menu, then we choose Manage Search Engines, and observe that there are two "google" search engines. One has a url similar to google.com/cse (for custom search engine) and is marked as the default. All we do is set one of the other search engines as default, then click the X to delete Mint's one.

Removing Mint's Default Search Engine