Categories
Music

How to use Reason with ReBirth RB-338 on 64-bit Windows 7 or 8

Probably because I'd been listening to some Acid Techno earlier in the week, I woke up this morning with the urge to play with a 303. So the obvious thing to do was to dig out ReBirth RB-338 and run it through Reason.

I was eventually able to get them working together on my computer (which runs Windows 7) but it took a few hours and its not easy, as the required information is all over the internet, not in one place. Next time I reinstall my computer I'll probably have to go through this all over again so I've made some notes which hopefully will also be of assistance to others.

One important thing to note is that this procedure will not work with Reason version 8.2 or higher because Propellerheads have abandoned the 32-bit version of Reason. If you have Reason 8.2 then you will have to either side-install 8.1 (as 8.2 and 8.1 may be able to co-exist) or downgrade to 8.1 in order to use ReBirth. I haven't tried it so I don't know for sure, but I would expect that any songs created in 8.2 would not open in 8.1.

You may need to use bittorrent to download some files if the Rebirth Museum website is offline- I recommend an open source client like Deluge as some of the past favourites like uTorrent have really gone down the pan lately.

32-bit Reason

ReBirth is an old application from long before the 64-bit days. It seems that 64-bit Reason will only talk view ReWire to 64-bit applications, so if you have Reason 6 or later (which are 64-bit by default) then you will need to install the 32-bit version of Reason. Its possible to do this side-by-side with your existing 64-bit version, without uninstalling it. Reason 8.2 or higher only comes in a 64-bit version, so you cannot use any later version of Reason after 8.1 in conjunction with ReBirth.

To install 32-bit Reason you need to start the installer with the parameter "/32". You can do this by running cmd.exe or you can do this with a shortcut. I'll show you how to do this with a shortcut.

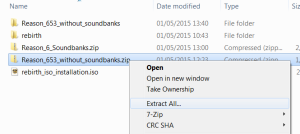
Download the reason installer from the account section of the propellerhead website. (If you have the original CD then you can skip downloading and adjust these instructions appropriately). The installation files should be in a .zip file, you will need to extract these to a folder somewhere (right-click on the .zip file and select "Extract All...").

Extract the .zip file containing reason

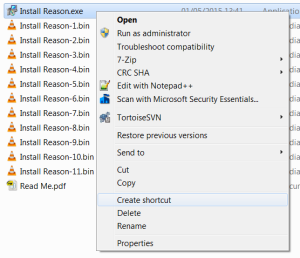
Browse to the folder that you extracted the images to, right-click on the .exe and select "Create Shortcut".

Create a shortcut to the installer

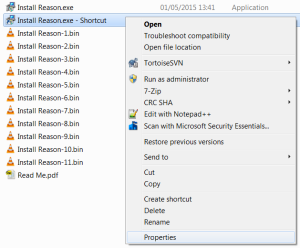
Edit the shortcut by right-clicking and selecting properties.

Edit the shortcut by selecting properties
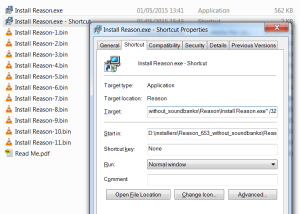
Edit the shortcut

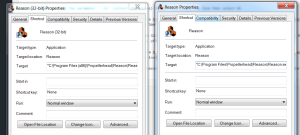
In the target box, add the parameter " /32" (without the quotes) to the very end of the line then select OK.

Add "/32" to the shortcut

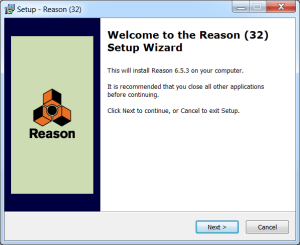
If you launch the shortcut now, the installer will install the 32-bit version of Reason instead of the usual 64-bit version. Remember, Reason 8.2 and higher no longer support 32-bit installations so you must be using a version of Reason less than this. You can verify that everything has gone ok so far, as the installer window that comes up will offer to install "Reason (32)", instead of the usual "Reason".

Reason (32) installer
32-bit Reason installer

Its possible to have both the 64-bit and 32-bit versions of reason installed simultaneously. Make sure that any shortcut you use to start Reason is starting the correct version - in Reason 6.5.3, both the 32-bit and 64-bit shortcuts in the start menu are given the name Reason, so its hard to distinguish between the two! You can check the shortcut you are using launches the correct version of Reason by verifying the installed directory - 32-bit Reason will install into a directory within "C:\Program Files (x86)\", while the 64-bit Reason will instal into "C:\Program Files\".

32-bit reason shortcut is on the left - notice the (x86)!

ReBirth RB-338

I've based this section on a 5 year old guide over at gearslutz, however some of the information is out of date.

Propellerhead have discontinued ReBirth (on computers at least - they have recently brought out an iPad App which you cannot use with Reason). However all is not lost, as they have released the original ReBirth as unsupported freeware. They have created an archive website called the ReBirth Museum where you can download ReBirth and get access to various mods that people have made for the programme over the last couple of decades.

Downloading ReBirth RB-338

Unfortunately, at the time of writing, the Rebirth Museum is down. Part of the website has been archived at The Wayback Machine however you need to register in order to download the ReBirth installer which means that archive.org can't help us. So we'll have to use bittorrent to download the necessary files. Maybe by the time you read this the ReBirth Museum will be back online, in which case you may be able to skip some of this section.

Firstly you need to retrieve an image of the rebirth cd. This is available via a bittorrent magnet link or you may be able to find it via google by searching for  "rebirth_iso_installation.iso" or "rebirth_iso_installation.zip". However there are a vast number of questionable sites purporting to provide a .torrent but instead providing suspicious .exe files so I highly recommend using the magnet link to avoid all that nonsense. If noone is seeding the first torrent, I also found a second torrent. If you're not sure which bittorrent client to use, I recommend an open source one like Deluge - some of the closed source clients are full of dodgy adverts.

Once you have the .iso file you may either burn it onto a CD or use some virtual cd drive software to mount it as a new drive letter. I recommend the second option as having to find and insert a CD to use a piece of software is rather inconvenient. I used Virtual CloneDrive which is freeware.

Insert the burnt CD, or mount the iso in CloneDrive as you will need this when you launch ReBirth. There is an installer on the CD however this doesn't work with 64-bit windows so you will need an alternative. Some kind chap has made a 64-bit compatible installer which you can find at sendspace, or via bittorrent. The 64-bit installer will place ReBirth into a fixed location: for me it was "C:\ReBirth RB-338\". Once it has finished running you must navigate to this directory and perform a few actions before you run ReBirth.

Post-Installation

Firstly, you may need to rename ReBirth.dll_ to ReBirth.dll and ReWire.dll_ to ReWire.dll. If either or both of those dlls are already suffixed with .dll this is ok, you've saved a bit of effort.

Secondly  you must acquire WinHlp32.exe. For Windows 7 try https://www.microsoft.com/en-us/download/details.aspx?id=91 and for Windows 8 try https://www.microsoft.com/en-us/download/details.aspx?id=35449. If you have no joy with those links, try searching Microsoft's website for WinHlp32.exe. If you have problems installing the file, have a look at section 2.3 of the gearslutz guide for some troubleshooting tips.

Edit (11/12/2015): Commenter ron (who is clearly a pretty cool dude) provides the following tips to install WinHlp32.exe on Windows 10:

i have got it working on win 10 64
just download winhelp for win 7 then
unzip and right click on install file and click edit
under the "settings" text add this
set WindowsVersion=7
goto :BypassVersionError
then save the file
then run as administrator and rebirth will work :)

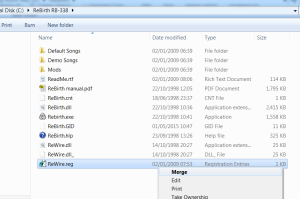
The final step to get ReBirth working with Reason is to configure ReWire. The installer didn't do this for me automatically, so I had to Merge the ReWire.reg file which exists in the ReBirth folder. Until I merged this file, I would get an error when adding the ReBirth instrument to Reason: "ReBirth not found / Could not load ReBirth Engine / Make sure ReBirth is properly installed".

Merge the registry file to configure Rewire

At this point you should be able to launch ReBirth. Press play and you should be able to hear the default tune.

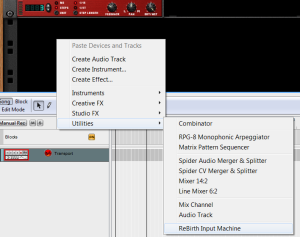
If that worked OK then you should be able to launch the 32-bit version of Reason and add a ReBirth Input Machine.

ReBirth Input Machine lives under Utilities

If its working correctly both green lights will be on, so wire up the instrument into the Mixer and pressing play in Reason. You should hear ReBirth's default tune playing again, but this time via Reason!

Both green lights will be on if its working correctly.

Any problems, let me know!

Categories
Music

EMU Legacy archive

Since Creative have taken the EMU Legacy pages offline, its no longer possible to get hold of for example OS updates for various devices such as the Proteus 2000, MP7, EMU Ultra etc. I am making available as much of the old material as possible here. Let me know in the comments if there's anything that's missing. Don't blame me if anything doesn't work (but please do let me know)!

(Edit: More recently some of these files have become available again  at http://www.creative.com/emu/support/downloads/legacy/ so its worth having a look there as well.)

(Edit2: and at some point that link stopped working again. Leaving it up for reference).

Proteus

pcp2xr.zip
pcp3xr.zip
pcp1.zip
pcp2.zip
pcp1xr.zip
pcp3.zip

Proteus 1000

This should be the OS update you need if you have any of the following:

  • Proteus 1000
  • XL-1 (not the turbo version)
  • Mo'Phatt
  • B-3
  • Planet Earth

p1k226.zip

Proteus 2000

The Proteus 2000 family contains the following:

  • Proteus 2000
  • Virtuoso 2000
  • Turbo Phatt
  • Orbit-3
  • Vintage Pro
  • XL-1 (turbo version)

E-Loader_1.1_Install.zip
Proteus2KOp-E.pdf
Proteus Family SysEx 2.2.pdf
p2k226.zip
E-LoaderOperationManual.pdf
E-Loader_1.1_Install.sit

Proteus 2500

E-Loader_1.1_Install.zip
E-LoaderOperationManual.pdf
patterns2500.zip
Command200.zip

Ultra

EOS28CL.EXE
eos40manual.zip
462prep.zip
EOS410CL.EXE

MP7

MP7Op-F.pdf
MpToMp7SMFBanks.zip
E-Loader_1.1_Install.zip
Proteus Family SysEx 2.2.pdf
command200.zip
MP7Patterns.zip
CSprepreadme.txt
MpToMp7SMFBanks.zip
E-Loader_1.1_Install.zip
command200.zip
MP7Patterns.zip
MpToMp7MIDBanks.zip
E-LoaderOperationManual.pdf
E-Loader_1.1_Install.sit
Cmd_Sta_2.0_Addendum.pdf
MpToMp7MIDBanks.zip
E-LoaderOperationManual.pdf
E-Loader_1.1_Install.sit
commandprep10.dli

EOS

EOS28CL.EXE
EOS_FAT_Addend.pdf
eos28cl.sit
eos40manual.zip
EOS410CL.EXE
EOS4-0.pdf
EOS470.zip
EOSV461.EXE
eos_v461.sit
eos410cl.sit
EOS460Addend.pdf
EOS_V461.EXE
EOS_V460.EXE
EOS410UL.EXE

Misc

ORCH2_drummap.txt
XLEAD_drummap.txt
AOrch_drummap.txt
World_drummap.txt
PHATT_drummap.txt
TeCnO_drummap.txt
P123_drummap.txt
ZR_drummap.txt

Manuals

Audity 2000: Audity_2000.pdf
B3: B3_Manual.pdf
Mo'Phatt: MOPhattRevB.pdf
Orbit 3: E-Mu_Orbit-3_Manual.pdf
Planet Phatt: E-Mu_PlanetPhatt_Manual.pdf
Proteus 1000: E-Mu_Proteus1000_Manual.pdf
Proteus 2000: Proteus2KOp-E.pdf
Xtreme Lead-1: E-Mu_XL-1_Manual.pdf
Xtreme Lead-1 Turbo: XL1TurboOp-A.pdf
Vintage Pro: E-Mu_VintagePro_Manual.pdf
Virtuoso 2000: Virtuoso 2000.pdf

Proteus 2000 Family SysEx specification: Proteus Family SysEx 2.2.pdf

Other Resources

There is another site archiving the "legacy" emu files, the Emu Legacy Wiki, and the Proteus 2000 family yahoo group. Some manuals available here.

Categories
Music

Yamaha FS1R tutorial

I found this old tutorial for the Yamaha FS1R fm synthesiser in the wayback machine and have reproduced it here for posterity.

Beginners Guide To The Yamaha FS1R

© 2000 R.C.Strange
written by R.C.Strange
email: rcstrange@hotmail.com
website: www.geocities.com/rcstrange2000

This Word document contains my understanding of the FM/FS synthesis used by the FS1R. I stress my understanding, as everything in here I have gleaned from the user manual, front panel and a couple of bits of demo software and have probably misunderstood some of it. If I’ve got anything wrong or missed anything important out, please let me know.

Disclaimer

I have no link with Yamaha whatsoever, other than the fact that I have bought one of their synths.

The point in writing this is to try to get a decent understanding of how the FS1R synthesises sound, to allow easier and better programming of sounds.

I start with the bleeding obvious but no doubt get into some complicated stuff pretty quickly. I’ve tried to write it assuming that whoever’s reading it knows very little about the subject, but wants to know about it. The reason for this is that we’ve all been there and there’s nothing worse than someone hiding behind a load of jargon. Jargon is often a sign that the person using it doesn’t understand what they’re on about either.

I’ve tried to put in a few practical examples along the way, as this not only makes it easier to understand, it makes it easier to explain too. So, I’d recommend reading this in front of your FS1R (if you have one). Also, don’t expect to follow everything or understand it immediately – it’s taken me months to get this far.

Although this information is copyrighted, please feel free to distribute this information as much as you wish if you are an individual – just as long as my name, email and website are at the top. Any companies or organisations wishing to use all or any part of this text are strictly prohibited from doing so.

Basics

The FS1R is a synthesiser. That means it makes up its sounds from scratch, unlike a sampler, which (fundamentally) plays back a digital recording (like a tape recorder), or many other keyboards which, although called synths, are actually a combination of samples and synthesis.

The type of synthesis used is based on Frequency Modulation (FM). Basically, it produces a voltage which varies with time (ie. it goes up and down). When you put this voltage into your amplifier, it gets converted to sound by the loud speakers moving forwards and backwards. All sound is made by this principle – something vibrates which pushes air about. Therefore, (in theory at least), any sound can be replicated as long as you push the air about in the correct way.

Another thing to know is that sound is made up of lots of different sine waves. If you had all the sine waves that the human ear can hear, all going at the same time, it’d be possible (in theory) to recreate any sound just by changing the volume of each sine wave up and down by the appropriate amount.

FM synthesis tries to recreate this by producing the sine waves required to create a sound. It’d be difficult to produce all sine waves that a human ear can hear, so instead it tries to get round it, getting close to the sound.


FM Synthesis


To start with, here’s the minimalist approach.

The FS1R is capable of producing a sine wave at a defined frequency. The frequency can be changed in many ways, but most important is that a keyboard attached via the MIDI port can do it by pressing different keys (ie. it can be ‘played’).

This produces a very simple ‘whistle’ sound – not too good if you want to recreate a piano or produce some weird, spacey effects.

So, you add another sine wave. This is a bit better but still quite simple. To get a more complicated sound, you could try using the first one to change the pitch of the second. This is called Frequency Modulation and starts to produce more complicated sounds.

The FS1R is capable of producing 8 of these sine waves (using 8 Oscillators), which can be combined in one of 88 fixed combinations (called Algorithms).

Each Oscillator can have its characteristics changed in various ways. For example, the volume can be changed over time, using the Envelope Generator (abbreviated to EG). This can fade in an Oscillator, hold it at a certain volume, then fade it out again after the key is released. The pitch of the Oscillator can also be changed in much the same way using the Pitch Envelope Generator (PEG).

There are also two Low Frequency Oscillators (LFOs). These are similar to the sound-producing Oscillators, but operate at a lower frequency (hence the name). These can also be used to vary the amplitude and frequency of the Oscillators to produce ‘tremolo’ and ‘siren’ effects. The amount of LFO applied to the Oscillators is often set up to be controlled via MIDI using the modulation wheel, so the further the wheel is pushed, the more the LFO varies the amplitude/pitch.

The output of the Algorithm can then be input to a Filter, which alters the treble and bass characteristics of the sound. The Filter can also be varied using the LFOs and via MIDI controllers.

On most older FM synths, oscillators could only generate sine waves. The FS1R is capable of producing these and other types of waves.

Noise Noise Noise

Many sounds have a ‘noise’ element associated with it, which is made up of lots of random frequencies. For example, a flute sound has the pitch of the note being played but also the sound of the air being blown over the mouth-piece. To help make these types of sound more realistic, each Oscillator also has a Noise-Generator associated with it. The Oscillator/Noise go to make up what Yamaha call an Operator. Yamaha call the Oscillator a Voiced Operator and the Noise Generator an Unvoiced Operator.

The grouping of Operators (i.e. the Algorithm) and the way their pitch and volume are varied is called a ‘Voice’. Up to 4 Voices can be combined to make up a ‘Performance’. Each Voice in a Performance can be input to the effects sections of the FS1R to give the sound a bit more depth and variation.

Note that only the Voiced Operators are linked together in an Algorithm. The Unvoiced Operator outputs are just added together like inputs to a mixing desk (i.e. exactly the same as Algorithm 1 on the FS1R).

Formants

The FM method described above is the way that many synths (such as the DX7) generate their sound. What makes the FS1R different is the inclusion of Formant Operators.

A Formant is basically a band pass filter, of which the centre-frequency, amplification and width can be varied with time. When several of these Formants are used within a sound, it can start to sound like a human voice.

Now, this is where the information from Yamaha starts to get woolly. Exactly how the Formant interacts with the Voice/Noise Operators hasn’t really been described by Yamaha in their manual. I know it’s a bit technical, but if you want to be able to create your own sounds from the lowest level up, you need to know this information. Yes, it’s possible to experiment and come up with some noises, but this is just guess work. A full explanation of this part of the synth wouldn’t go amiss. The user guide details each parameter that can be modified and what settings it can take, but without a bit more explanation about how the parameters interact, they end up just stating the obvious. Take the ‘form’ parameter under the ‘voice/operator/osc’ menu. The settings for this can be sine, odd1, odd2, res1, res2 or formant. OK, so the first ones are standard waveforms that will be described in most books on synthesisers. The last one, though, is particular to the FS1R. It seems to be fundamental to the Formant Synthesis part of the synth, so an explanation of what it is, what it interacts with, and what interacts with it wouldn’t go amiss. Just because the bods at Yamaha know this stuff doesn’t mean the rest of us do. If they want us to go out and use their synths, they should make this information freely available.

Try It Out

Right – try this out. Initialise a Performance on the FS1R and set it up to only consist of Part 1. Initialise the Voice associated with this Part. Don’t worry about losing the Performance and Voice – as long as you don’t store them, they will be restored when you select a new Performance (you could always do a MIDI dump to backup the FS1R if you’re worried).

Playing this Performance should now produce a sine wave. This is because the initialised Voice has only one Voiced Operator active which is set up to produce (surprise, surprise), a sine wave. The Algorithm used is number 1, which just mixes the outputs of all Operators together – no Frequency Modulation takes place.

Try adding another Voiced Operator to fatten the sound up a bit. To do this, select Voiced Operator 2 and turn its ‘output’ parameter up. Set its frequency to be the twice the first Operator. You should now be able to hear 2 sine waves. Adding more Voiced Operators will fatten up the sound.

Next, let’s make some noise. Turn off all the Voiced Operators by setting their ‘output’ parameters to 0. Then select Unvoiced Operator 1 and turn its ‘output’ parameter up. This should now produce a sound like a radio does when it’s not tuned in to a station. This is caused by lots of sine waves being generated at lots of differing frequencies.

By altering the ‘frequency’, ‘bandwidth’ and ‘skirt’ parameters, the characteristics of the noise can be altered. Changing the ‘resonance’ parameter will exaggerate the centre frequency. Increasing the resonance and decreasing the bandwidth will make the range of frequencies produced less and less until, at its maximum value, it will filter through just one frequency, so a sine wave is produced (useful if you run out of Voiced Operators).

This is all very good, but what about these bleeding formants?

Well… it seems that the Voiced Operators act as formants when the ‘wave’ parameter is set to ‘frmt’. As the Voiced/Unvoiced Operators form a ‘formant pair’, the Unvoiced Operator gets ‘formanted’ by the Voiced one.

If the Operators have their ‘fseq switch’ set to on, they’ll formant according the current fseq set in the ‘performance/common/fseq’ menu (as long as the fseq is assigned to part 1 of the performance in this menu).

There’s also an ‘fseq track’ number parameter that determines the fseq track to use for each Operator. Apparently, fseqs are made up of 8 tracks (like an 8-track tape recorder). Each track contains information on how the frequency, volume and width for one formant changes when the fseq is played. Each Operator then has a track assigned to it. Usually, track 1 is assigned to Operator 1, track 2 to Operator 2, etc, but this doesn’t have to be the case. All Operators could have track 1 assigned to them, or Operator 8 could have track 8 assigned, Operator 2 track 7, etc. Each fseq track can be assigned to more than one Operator, but each Operator can only have one track assigned to it.

Try setting all Voiced Operator volumes up, set them to be ‘fmnt’s using the ‘Form’ parameter and set their ‘Fseq Switch’ to ‘on’. Turn all Unvoiced Operator volumes up, set their ‘FreqMode’ to ‘linkF0’ and also set their ‘Fseq Switch’ to ‘on’. Make sure Algorithm 1 is selected.

This should now let you hear all fseqs when they are played. Some sound better than others. I think this is because some fseqs need to be used with particular types of sounds (eg. Drums need more noise, vocal effects need more FM).

Algorithm

At last. You’ve set up a Voice from scratch to produce an fseq. If you’ve followed what was described in the previous section, you’ll have 8 Unvoiced Operators being formanted by the 8 Voiced ones, the outputs of which are all mixed together to produce the sound you hear.

Remember, though, the FS1R is capable of FM synthesis – i.e. one Operator modulating another. The above example used Algorithm 1, which just mixes the outputs of all the Operators together. Instead, a different Algorithm could be used. Number 6, for example, modulates Operator 2 using Operator 1, and modulates Operator 4 using Operator 3. So, Operators 2 and 4 could be used to formant Operators 1 and 3.

Let’s try this out. Re-initialise the current Performance and Voice and select Algorithm 6. Now, set the ‘output’ parameters for Voiced Operators 1..4 to their maximum value. As all Operators are producing sine waves, a basic sort of sound should come out which probably sounds much like an old 60’s organ. Now, try setting the wave forms of Operators 2 and 4 to ‘frmt’ (using the ‘form’ parameter in ‘Voice/operator/Osc’) and turn their ‘fseq switch’ parameters to ‘on’. You will also need to make sure the ‘Performance/common/fseq’ parameter is set to Part 1, as before, and that the selected Fseq is valid,e.g. ‘Pre>01’ (my FS1R defaults to an internal Fseq, of which I have none. This means no Fseq is played).

This produces some weird sounds, some of which nearly sound like voices. Some don’t produce sound at all (eg. The drum loops) – typically these are the ones that need some noise in order to sound properly.

Formant Sequences (Fseqs)

Up until now, the fseqs have probably been playing from start to finish (the FS1R seems to change the ‘start’ and ‘end’ parameters of the fseq itself sometimes). Found any that you’d ever seriously use in a recording? Me neither. However, with a bit of messing around, it’s possible to change all that.

Fseqs can be played in a number of different ways. The most obvious is starting at the beginning and running until the end. The point at which to start and end the fseq can be altered and fseqs can also be looped, much like looping a sample. If the start point is set to be higher than the end point, the fseq will play backwards. This gives the opportunity to create all sorts of weird sounds, e.g. playing a short part of a sequence, looping it or reversing it.

The speed of an fseq can be changed, so slowing one right down when applied to a synth pad sound may give it that ‘spacey’ quality where it’s continuously changing. This can be used in conjunction with the LFOs and EGs to produce some great pad sounds. Add a few effects to this and you’ll think you’ve been transported onto the 2001 film set.

The speed can also be synced to a MIDI clock – turn the speed down past 0% to do this - then start your sequencer and play a few notes. If the selected fseq has a rhythm to it, it should be in time with the sequencer.

All the above is done in ‘fseq’ mode. There is also a ‘scratch’ mode, whereby the fseq can be played by moving the ‘Format’ controller on the front panel. Rotate it one way and it plays forwards as you rotate it, rotate it the other way and it’ll play backwards, a bit like pushing a record round on a record-deck (hence the ‘scratch’ name).

Changing Formants – Do It Yourself

It probably hasn’t escaped your attention that there is a ‘Formant’ knob stuck on the front of the FS1R. Whilst this can be configured to control many parameters, a lot of the preset Performances use it to control the Formant Operators.

Basically, it allows you to change 5 of the ‘Formant’ parameters at the same time using one controller – especially useful for live work. For example, the centre frequency of Voiced Operators 1..5 can all be assigned to the one controller, or width, centre frequency and volume for Unvoiced Operator 1, and frequency and width for Voiced Operator 1, etc, etc.

How much effect turning the knob has can also be set up – positive values increase the selected Formant parameters when the knob is turned clockwise, negative values increase the parameters when it is turned anti-clockwise.

This can be used on its own to control the sound (for yet more slowly varying pad sounds, this time with you varying the formants rather than the fseq), or in conjunction with the fseqs.

Goodbye

Now you’re on your own. If you followed it this far, you know everything you need in order to create sounds that are really different to the usual ones you get in most synths.

Those of you that gave up and sold your FS1R – you mugs! You don’t know what you’re missing.
Categories
Music

M-Audio Delta 1010 sound stops working for some applications on Windows 7 x86

I've had occasional audio playback problems. My symptoms are that websites and videos will suddenly stop making any sound in firefox while I can still play tunes in vlc. Restarting firefox makes no difference. If I fire up other applications, they stop making sound as well.

It turns out that there's a problem with the version 5076 drivers for the M-Audio Delta 1010 and 1010LT on 64 bit Windows 7. It can be solved by restarting the windows sound service.

Categories
Music

Deciphering the TC Electronic M350 SysEx format

I recently acquired a TC Electronic M350 effects unit. One if its features is midi connectivity, which allows you to backup or edit the presets on a PC - although the interface exposes every setting so there's not much reason to edit them on the PC.

Unfortunately the librarian/editing software that TC electronic make available (called Vyzor but actually a customised version of a librian product called Uniquest) doesn't work very well on Windows 7 64 bit.

They barely mention their sysex support in the manual and in fact what little they do mention, they get wrong! (The correct procedure to manually initiate a bulk preset dump is to hold the preset on/off key down for approximately 2.5 seconds, scroll up until the display says bd for bulk dump mode, and then press the preset on/off button again).

Anyway I could find no information on the internet concerning the sysex specification of the device so it was clear I needed to reverse engineer the M350's sysex messages and implement a driver for it in JSynthLib which is a librarian/editor that actually works on Windows 7 (and also Macs and Linux as it is cross-platform).

I have made the following notes which I am leaving up here in case they are useful to anybody in the future.

TC Electronic M350 system exclusive spec for firmware version 1.3:

Device Inquiry f0 7E 7F 06 01 F7 elicits a reponse F0 7E 7F 06 02 00 20 1F 58 00 00 00 00 00 01 03 F7. Note that prior to upgrading the firmware, it responded to the Device Inquiry thusly: F0 7E 7F 06 02 00 20 1F 57 00 00 00 00 00 01 01 F7. Note that not only does the software version increase form 1.1 to 1.3, the "device number" changes from 57 to 58, perhaps indicating that the sysex implementation has changed somewhat between versions.

The basic sysex format is:

F0 00 20 1F 00 58 mm <data> F7

mm is the message type and there seem to be the following message recognised:

20: patch data (bi-directional)
22: value change (bi-directional)
45: request patch (to device only)
47: request parameter value (to device only)

message type 20 patch data

F0 00 20 1F 00 58 20 pp uu aa aa aa aa aa aa aa aa aa aa aa aa aa aa aa aa aa aa aa aa bb bb cc dd ee ff gg hh ii jj kk ll F7
pp = patch number, (00 = edit buffer)
uu: unknown always 00(maybe bank #? but unused as far as I can see)
aa 20 chars patch name
bb bb 2 bytes - tap (milliseconds, LSB first)
cc input gain
dd mix ratio
ee effect bal
ff delay effects
gg delay/timing
hh feedback/depth
ii reverb type
pre delay
jj decay time
kk colour filter
ll checksum - this is calculated simply by summing all the data bytes (i.e. not the header bytes and not the checksum/tail bytes)

message type 22 real time parameter changes sent by editor software or device (seems to be a duplicate of the normal midi controller messages)

f0 00 20 1F 00 58 22 01 xx yy yy F7

yy = value (second yy is 0 apart form for 0d tap in ms)
xx = parameter number:
00 = input gain
01 = mix ratio
02 = effect bal
03 = delay effects ( yy = 00 - 0f )
04 = delay timing
05 = feedback depth
06 = reverb type (yy = 00 - 0f)
07 = predelay
08 = delay time
09 = colour filter
0a = bypass toggle (yy = 00 / 7f)
0b = dual input mode toggle ??????? pure guess
0c = digital input toggle (yy = 00 / 7f)
0d = tap in ms ( 2 bytes, LSB first )
0f = toggles front panel lock - 40+ makes it remote controlled, less than that makes it editable
10 = delay effects on/off toggle?
11 = reverb effects on/off toggle?

Note that parameters 0a/0b/0c/0f/10/11 can be controlled via the software, but are not sent or stored in the patches.

message type 45 request patch
F0 00 20 1F 00 58 45 pp bb F7

pp is patch number

bb is always 00 but I speculate this could be bank number, possibly in future versions of this device.
message type 47 request parameter value
F0 00 20 1F 00 58 47 xx F7
xx = parameter number as listed for message 22