Categories
Music

M-Audio Delta 1010 sound stops working for some applications on Windows 7 x86

I've had occasional audio playback problems. My symptoms are that websites and videos will suddenly stop making any sound in firefox while I can still play tunes in vlc. Restarting firefox makes no difference. If I fire up other applications, they stop making sound as well.

It turns out that there's a problem with the version 5076 drivers for the M-Audio Delta 1010 and 1010LT on 64 bit Windows 7. It can be solved by restarting the windows sound service.

Categories
Music

Deciphering the TC Electronic M350 SysEx format

I recently acquired a TC Electronic M350 effects unit. One if its features is midi connectivity, which allows you to backup or edit the presets on a PC - although the interface exposes every setting so there's not much reason to edit them on the PC.

Unfortunately the librarian/editing software that TC electronic make available (called Vyzor but actually a customised version of a librian product called Uniquest) doesn't work very well on Windows 7 64 bit.

They barely mention their sysex support in the manual and in fact what little they do mention, they get wrong! (The correct procedure to manually initiate a bulk preset dump is to hold the preset on/off key down for approximately 2.5 seconds, scroll up until the display says bd for bulk dump mode, and then press the preset on/off button again).

Anyway I could find no information on the internet concerning the sysex specification of the device so it was clear I needed to reverse engineer the M350's sysex messages and implement a driver for it in JSynthLib which is a librarian/editor that actually works on Windows 7 (and also Macs and Linux as it is cross-platform).

I have made the following notes which I am leaving up here in case they are useful to anybody in the future.

TC Electronic M350 system exclusive spec for firmware version 1.3:

Device Inquiry f0 7E 7F 06 01 F7 elicits a reponse F0 7E 7F 06 02 00 20 1F 58 00 00 00 00 00 01 03 F7. Note that prior to upgrading the firmware, it responded to the Device Inquiry thusly: F0 7E 7F 06 02 00 20 1F 57 00 00 00 00 00 01 01 F7. Note that not only does the software version increase form 1.1 to 1.3, the "device number" changes from 57 to 58, perhaps indicating that the sysex implementation has changed somewhat between versions.

The basic sysex format is:

F0 00 20 1F 00 58 mm <data> F7

mm is the message type and there seem to be the following message recognised:

20: patch data (bi-directional)
22: value change (bi-directional)
45: request patch (to device only)
47: request parameter value (to device only)

message type 20 patch data

F0 00 20 1F 00 58 20 pp uu aa aa aa aa aa aa aa aa aa aa aa aa aa aa aa aa aa aa aa aa bb bb cc dd ee ff gg hh ii jj kk ll F7
pp = patch number, (00 = edit buffer)
uu: unknown always 00(maybe bank #? but unused as far as I can see)
aa 20 chars patch name
bb bb 2 bytes - tap (milliseconds, LSB first)
cc input gain
dd mix ratio
ee effect bal
ff delay effects
gg delay/timing
hh feedback/depth
ii reverb type
pre delay
jj decay time
kk colour filter
ll checksum - this is calculated simply by summing all the data bytes (i.e. not the header bytes and not the checksum/tail bytes)

message type 22 real time parameter changes sent by editor software or device (seems to be a duplicate of the normal midi controller messages)

f0 00 20 1F 00 58 22 01 xx yy yy F7

yy = value (second yy is 0 apart form for 0d tap in ms)
xx = parameter number:
00 = input gain
01 = mix ratio
02 = effect bal
03 = delay effects ( yy = 00 - 0f )
04 = delay timing
05 = feedback depth
06 = reverb type (yy = 00 - 0f)
07 = predelay
08 = delay time
09 = colour filter
0a = bypass toggle (yy = 00 / 7f)
0b = dual input mode toggle ??????? pure guess
0c = digital input toggle (yy = 00 / 7f)
0d = tap in ms ( 2 bytes, LSB first )
0f = toggles front panel lock - 40+ makes it remote controlled, less than that makes it editable
10 = delay effects on/off toggle?
11 = reverb effects on/off toggle?

Note that parameters 0a/0b/0c/0f/10/11 can be controlled via the software, but are not sent or stored in the patches.

message type 45 request patch
F0 00 20 1F 00 58 45 pp bb F7

pp is patch number

bb is always 00 but I speculate this could be bank number, possibly in future versions of this device.
message type 47 request parameter value
F0 00 20 1F 00 58 47 xx F7
xx = parameter number as listed for message 22

Categories
Linux

Running a python script that requires libgsf on Ubuntu 11.04

I was exploring a project concerned with reverse engineering some file formats (https://gitorious.org/re-lab/tools) and I needed to run a python script. This python script requires libgsf (the gnome structured file library: http://projects.gnome.org/libgsf/ ), however the debian/ubuntu packages for this aren't built with python support!

This led to errors such as:

frankster@linux-virtualbox:~/relab/tools/oletoy$ ./view.py
Traceback (most recent call last):
  File "./view.py", line 23, in <module>
    import Doc, cmd
  File "/home/frankster/relab/tools/oletoy/Doc.py", line 19, in <module>
    import ole,mf,svm,cdr,clp,rx2
  File "/home/frankster/relab/tools/oletoy/ole.py", line 23, in <module>
    import vsd, xls, ppt, vba, doc
  File "/home/frankster/relab/tools/oletoy/vsd.py", line 19, in <module>
    import gtk,gsf
ImportError: No module named gsf

Getting libgsf compiled was a bit of a pain so here are some tips that may be helpful. I initially attempted to modify the ubuntu package and simply enable the configuration switch for python support. However there are some problems with the paths for python includes in the debian build scripts that I didn't get to the bottom of. So instead of building a custom ubuntu package, I uninstalled the official libraries and built my own version. I was still able to use the debian package build infrastructure to automatically fetch the source code and the build-dependencies which made things a little easier!

sudo apt-get source libgsf
sudo apt-get install python-dev
sudo apt-get build-dep libgsf
cd libgsf-1.14.21
./configure --with-python
make
sudo make install

Check that you had all required python development libraries installed during the configure stage by looking for the following lines towards the end:

checking for python... /usr/bin/python
checking for python version... 2.7
checking for python platform... linux2
checking for python script directory... ${prefix}/lib/python2.7/dist-packages
checking for python extension module directory... ${exec_prefix}/lib/python2.7/dist-packages
checking for headers required to compile python extensions... found
checking for PYGTK... yes
checking for pygtk-codegen-2.0... /usr/bin/pygtk-codegen-2.0
yes

If you only saw some of these lines, then the python component won't get built!

Once you have got this far, your python script should now detect the gsf module. As your manual install of libgsf will have gone into the /usr/local/ tree, your python script may not be able to locate the library it needs to link to. If this happens you will see an error like the following:

Traceback (most recent call last):
  File "./view.py", line 23, in <module>
    import Doc, cmd
  File "/home/frankster/relab/tools/oletoy/Doc.py", line 19, in <module>
    import ole,mf,svm,cdr,clp,rx2
  File "/home/frankster/relab/tools/oletoy/ole.py", line 23, in <module>
    import vsd, xls, ppt, vba, doc
  File "/home/frankster/relab/tools/oletoy/vsd.py", line 19, in <module>
    import gtk,gsf
  File "/usr/local/lib/python2.7/dist-packages/gsf/__init__.py", line 8, in <module>
    from _gsf import *
ImportError: libgsf-1.so.114: cannot open shared object file: No such file or directory

If this happens you can solve it by telling the linker where it needs to look to find the library:

$ LD_LIBRARY_PATH=/usr/local/lib ./view.py

You can of course make this permanent in your .profile or .bashrc or whatever.
Categories
Linux

Increasing the size of the main linux partition (Ubuntu 11.04)

I have an installation of Ubuntu 11.04 running as a virtual machine under VirtualBox. It recently ran out of space, so I needed to expand the partition.

First I made a new partition that was larger than my existing partition (i.e. I created a new disc image in VirtualBox).

I then added the Ubuntu 11.04 DVD image to my VM as a new DVD device. I also needed to remove the VBoxGuestAdditions.iso, as it turns out that the VirtualBox bios only lets you boot off the first CD/DVD it finds.

That done, I fired up my VM and pressed F12 to get into the boot device menu, then chose to boot from CD. When this booted up I chose the option to run the live cd rather than install Ubuntu.

Once I hit the gnome2 desktop, I fired up a terminal and ran

$ sudo gparted

gparted showed two discs - sda and sdb. sda1 was my linux partition, and there was an extended partition containing a swap partition on sda5. sdb was empty as expected. I performed the following actions:

  • select and copy the sda1 partition.
  • switch to sdb and create a partition table.
  • paste the sda1 partition into sdb, and change its size so it fills the entire disc minus 500MB or whatever you want for the swap partition.
  • create an extended partition on sdb
  • create a new swap partition inside the extended partition.
  • I set the partition flag bootable on sdb1 although I don't think this was necessary.

Having done this I now needed to install grub. To get grub to work, I had to chroot into the new partition before installing it.

$ sudo mkdir /mnt/sdb1
$ sudo mount /dev/sdb1 /mnt/sdb1 -t ext2
$ sudo mount --bind /dev /mnt/sdb1/dev
$ sudo mount --bind /proc /mnt/sdb1/proc
$ sudo mount --bind /sys /mnt/sdb1/sys
$ sudo chroot /mnt/sdb1
$ sudo grub-install
$ sudo update-grub

At this stage I shutdown, and removed the old linux partition from my VM. When I started up again, it succesfully booted into my VM, from where I am writing this article!

Categories
Linux

Broken onboard wifi on a Lenovo G530 (4446) and Ubuntu 11.04

I have a Lenovo laptop which has for a while had problems with the onboard wireless card, so I have been using a usb wireless device instead. I don't use wifi very often as I mostly have it connected to an ethernet cable, so although a bit annoying its not too much hardship having to use the usb device.

I recently put Ubuntu 11.04 on the laptop because the performance I was getting from Windows XP was deteriorating rapidly. I don't like the new Unity interface, chiefly because it forces you to have the panel on the left hand side, which is fine unless you use two monitors and you want your default monitor on the right, then you get the panel in the middle of your two screens instead of on one side. Unfortunately Mark Shuttleworth has insisted that It Must Be This Way so I can't see it changing any time soon, thus I'm sticking with the traditional Gnome2 interface.

Anyway, for whatever reason the network manager applet gets confused by the two network adaptors I have, and won't let me connect to a network on the usb adaptor, stating that its disabled in hardware. This is incorrect, its only the onboard network adaptor that has its wifi switch disabled (and in fact changing the switch doesn't make any difference to whether or not network manager thinks its disabled or not).

Running "rfkill list" confirms that the onboard adaptor is disabled in hardware, but the usb adaptor is not. The solution I found was to blacklist the modules used by the onboard adaptor. So I ran:

$ sudo vim /etc/modprobe.d/blacklist.conf

and I added the following lines:

blacklist iwlcore
blacklist iwlagn

I was finally able to connect to wifi using the usb adaptor after also running:

$ sudo rmmod iwlcore iwlagn
Categories
Games Windows

Dragon Age: Origins DLC authorisation problem


I fired up Dragon Age: Origins for the first time in a while and it would get to the main screen but it would not load my saved game. It claimed that I was not authorised to use the following downloadable content:
  • Warden's keep
  • Blood dragon armour.
  • The stone prisoner
  • Golem's might (for origins)
  • Witch hunt
  • Return to ostagar
  • Feastday gift
  • Feastday pranks
  • Golems' might (for awakening)
  • The darkspawn chronicles
  • Blightblood(for origins)
  • Witchcraft(for origins)
  • Leilina's son(for origins)
  • Battledress of the provocateur (for origins)
  • Battledress of the provocateur (for awakening)
  • The golems of amgarrak
Although I own Dragon Age: Origins Ultimate Edition which contains both Dragon Age: Origins and Dragon Age: Awakening, I have never played Dragon Age: Awakening as I have not quite finished the final battle of Dragon Age: Origins. Its rather odd that my saved game seems to require DLC for a different game that I haven't even played yet.
Enabling the "Dragon Age: Origins - Content Updater" service did not help - as there was no service installed!
I next ran the following file: http://supportfiles.bioware.com/dragonage/DAUServiceDiagnostic_beta.exe. This then displayed an error stating that it couldn't find a copy of the game and I needed to reinstall it.
After the slow install process, and placing the DVD back in the drive (seriously, why do I need to put a DVD in to play a game with online authorisation?) I was able to reload my saved game.
Categories
Windows

procmon from sysinternals help file doesn't open

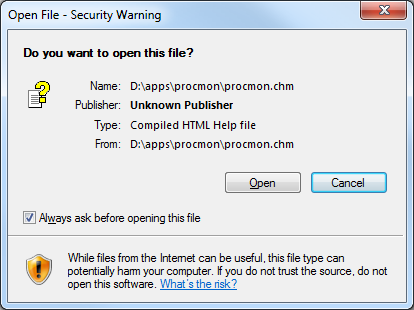
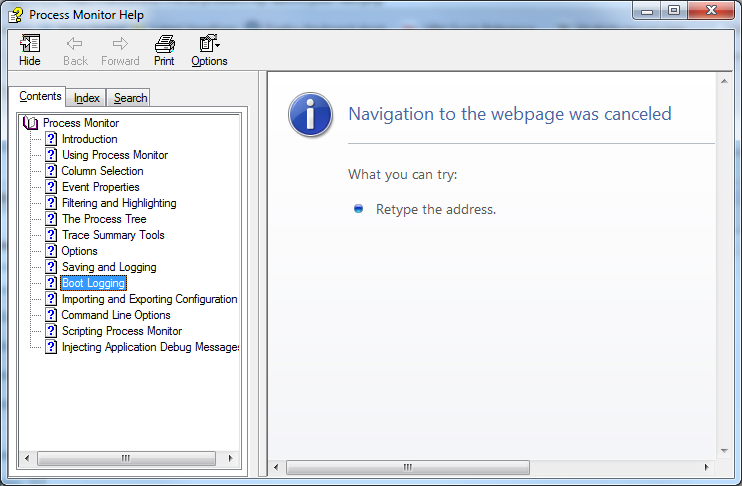
If you attempt to access the help file from within procmon on Windows Vista or Windows 7, its possible that windows may refuse to display the help file. It turned out that there was a security flag that needed to be cleared.

ProcMon Help Problem

To do this, I browsed to the directory where I had installed procmon and opened the .chm file which caused the following dialogue to appear: ProcMon Security Warning

I unchecked the "Always ask before opening this file" box, and then when I accessed the help from within process monitor, I was able to view the help file properly.


Categories
Windows

Windows 7 won't boot after removing a disc

I recently had to reinstall windows 7 due to a faulty Seagate 1.5TB hard disc - the second time this exact model has failed for me (although the two drives were manufactured 18 months apart from each other).

After reinstalling windows, I had 2 different windows installations: the new installation on a fresh disc and the old installation on the faulty disc. I believe this may have caused "BOOTMGR" not to be installed on my new disc, instead I suspect the installer left it on the original, faulty disc.

Some time after the new installation, I removed the faulty disc which unfortunately stopped windows booting - my computer would stop just after the BIOS screens with a blank screen.

My first reaction was to dig out my windows 7 setup disc, boot from it and perform a repair. This didn't go so well because the repair dialogue couldn't recognise the windows installation!

This caused the automatic repair to misidentify my boot drive, and it seemed to get confused by an SD card that was inserted into my usb card reader, as the automatic repair attempted to update the partition table on the sd card!

I attempted to manually repair by using DISKPART to set the windows partition to drive c: and then ran the following commands which I saw in a microsoft forum post.

BOOTREC /FIXMBR

BOOTREC /FIXBOOT

BOOTREC /REBUILDBCD

BOOTREC /SCANOS

Unfortunately the FIXBOOT and REBUILDBCD stages both gave errors (although the scanos was able to locate the windows installation).

After removing the sd card reader, and rebooting the windows 7 install disc, the repair dialogue was now able to locate the windows installation. After doing this an earlier dialogue box popped up offering a solution (which was basically reinstalling BOOTMGR I believe).

I rebooted again but it still didn't boot! However there was now a different error message, which indicated that the first stage of the boot had succeeded.

So I rebooted again into the Windows 7 installation CD. Rather than try the automatic repair tool which I had lost confidence in a little, I entered DISKPART and ensured my windows installation volume had the appropriate drive letters, then ran the above 4 BOOTREC commands.

After this my computer booted successfully.

Categories
Linux

ubuntu 10.10 upgrade nvidia driver stops working

I recently updated a machine from ubuntu 10.04 to ubuntu 10.10. After reboot the nvidia driver wouldn't load and /var/log/Xorg.0.log contains:

[    25.820] (EE) NVIDIA: Failed to load the NVIDIA kernel module. Please check your
[    25.820] (EE) NVIDIA:     system's kernel log for additional error messages.
[    25.820] (II) UnloadModule: "nvidia"
[    25.820] (II) Unloading /usr/lib/xorg/extra-modules/nvidia_drv.so
[    25.820] (EE) Failed to load module "nvidia" (module-specific error, 0)
[    25.820] (EE) No drivers available.
The solution was to run
$ sudo dpkg-reconfigure nvidia-current
which caused nvidia modules to be rebuilt. This showed me I was missing source for the running kernel version, so I then installed nvidia-185-kernel-source which was enough to get it back on its feet.